adriana


This Translation has been made with PSPX5 and PSPX9, it's also possible with other versions of PSP
The original Tutorial is from Monaliza, I have her permission to translate it into Dutch and English
Merci Monique
Use your own Woman-tube
My Tube: 3071-woman-LBTUBES
It's not allowed to copy or download this tutorial in other sites/blogs without permission or spread under your own name
Click on the banner for the original tutorial

**************
Materials

**************
In Zip
Narah_Mask_1437
Narah_Mask_1440
adriana_deco_cadre
mz_adriana_titre
mz_deco_adriana
mz_sel_adriana 3 selecties
raster1
texte_adriana
Presets: 04_shadow / adriana_glass (Eye Candy Filter)
**************
Plugins
Alien Skin Eyes Candy 5 - Impact - Perspective Shadow / Glass
Filters Unlimited 2.0 - &<BKG Designer SF10 I> - Cruncher
Filters Unlimited 2.0 - &<BKG Kaleidoscope - @BlueBerry Pie
L en K landksiteofwonders - L en K's Katharina
MuRa's Meister - Copies
Filters Here
Doubleclick on the Presets 04_shadow / adriana_glass, to install in Eye Candy Filter (or import yourself)
Selections in Selectionmap Psp
Open Tube, Masks etc. in Psp
Use 2 Colors from your Tube and Black and White, play with the Blend Mode and Opacity
Respect the work/material of the tubers and do not delete the name of the artist, don't share
Colors original Tutorial

Make your own Colorpalette, to switch Colors easely
Tutorial
1
Open materials in Psp, duplicate (shift D) and close the original, work with duplicates
Foregroundcolor (1) and Backgroundcolor (2)
Make a Linear Gradient with your Foregroundcolor

Open a New transparent Image of 850 / 500 px
Fill with Gradient
2
Effects - Plugins - MuRa's Meister - Copies

Sometimes this Plugin gives a wrong result, in that case you can use Raster1 out of the Zip, adjust Colors and work with this
-
Layers - Duplicate
-
Effects - lugins - Filters Unlimited 2.0 - &<BKG Kaleidoscope - @BlueBerry Pie
Default
-
Blend Mode to Overlay or another one and Opacity of your choice (I did 67)
3
Layers - Duplicate
Effects - Distortion Effects - Polar Coordinates

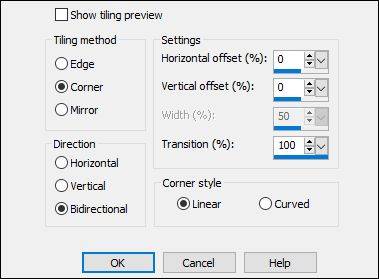
Effects - Image Effects - Seamless Tiling
Blend Mode to Overlay or another one and Opacity of your choice (I did 55)
4
Activate Middle Layer
Image - Mirror
-
Selections - Load/Save Selection - Load Selection From Disk - mz_sel_adriana
Promote Selection to Layer
-
Effects - Plugins - L en K landksiteofwonders - L en K's Katharina

Selections - Select None
5
Effects - Distortion Effects - Wind - 100 - Right
-
Effects - Reflection Effects - Rotating Mirror - Color 1

Blend Mode to Screen or another one
Effects - Edge Effects - Enhance
Layers - Merge - Merge Visible
6
Layers - New Raster Layer
Fill with White
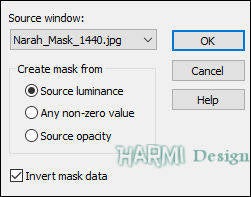
Layers - New Mask Layer - From Image......Narah_Mask_1440
Layers - Merge - Merge Group
Image - Mirror
Image - Flip
7
Layers - New Raster Layer
Fill with White
Layers - New Mask Layer - From Image......Narah_Mask_1437
Layers - Merge - Merge Group
-
Image - Resize - 62% - All Layers NOT checked
Adjust - Sharpness - Sharpen
-
Press K on Keyboard (Pick Tool)
Positie X (Hor.) 326 and Positie Y (Vert.) 95

Press M on Keyboard (Move Tool)
8
Activate Bottom Layer
Selections - Load/Save Selection - Load Selection From Disk - mz_sel_adriana1
Promote Selection to Layer
Layers - Arrange - Bring to Top
-
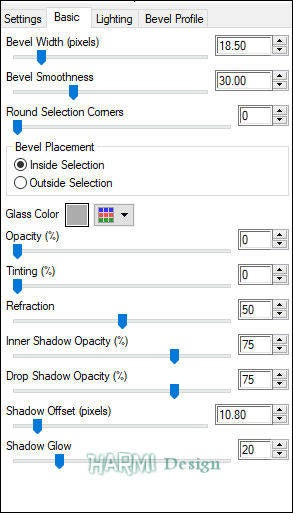
Effects - Plugins - Alien Skin Eyes Candy 5 - Impact - Glass - adriana_glass
Selections - Select None
9
Open texte_adriana
Edit - Copy
Back to your Image
Edit - Paste As New Layer
-
Drag into the Circle
-
Selections - Load/Save Selection - Load Selection From Disk - mz_sel_adriana2
Activate Bottom layer
Promote Selection to Layer
Selections - Select None
-
Effects - Plugins - Filters Unlimited 2.0 - &<BKG Designer SF10 I> - Cruncher
Default
-
Effects - Edge Effects - Enhance
-
Effects - IPlugins - Alien Skin Eyes Candy 5 - Impact - Perspective Shadow - 04_shadow

10
Activate Top Layer
-
Open mz_deco_adriana
Edit - Copy
Back to your Image
Edit - Paste As New Layer
-
Effects - Image Effects - Offset
Horizontal 65 / Vertical -8
Custom and Repeat checked
-
Open your Tube
Edit - Copy
Back to your Image
Edit - Paste As New Layer
-
Resize eventually and drag Tube to the Left, Drop Shadow of your choice
-
Open mz_adriana_titre
Edit - Copy
Back to your Image
Edit - Paste As New Layer
-
Drag to the Bottom and to the Right
11
Image - Add Borders 1 px with Black - Symmetric
Image - Add Borders 10 px with Color 1 - Symmetric
Image - Add Borders 1 px with Color 2 or Black -Symmetric
Image - Add Borders 20 px with Color 1 - Symmetric
Image - Add Borders 1 px with Color 2 or Black - Symmetric
Image - Add Borders 40 px with Color 1 - Symmetric
12
Select the Border of 40 px with your Magic Wand Tool (Feather and Tolerance 0)
Activate Flood Fill - Opacity of your choice (I did 75)
Fill Selection with the Linear Gradient from the beginning or use other Colors
Selections - Select None
Flood Fill back to 100 Opacity
-
Open adriana_deco_cadre
Edit - Copy
Back to your Image
Edit - Paste As New Layer
Set your name/watermark on a new Layer and Merge All, Resize if you like and save as Jpg
I really like to see your Version

Another Version, Tube SvB (1110) Beauty
