ann

This translation has been made with PSPX5 and PSPX9, it's also possible with other versions of PSP
The original Tutorial is from Monaliza, I have her permission to translate it in Dutch and English
Merci Monique
Use your own Tube (man/woman)
My tube: AR 465 (Ana Ridzi)
It's not allowed to copy or download this tutorial in other sites/blogs without permission or spread under your own name
Click on the banner for the original tutorial
**************
Material
**************
In Zip
Narah_mask_0183
mz_sel_ann
mz_sel_ann1
mz_sel_ann2
mz_sel_ann3
ann_titre
ann_text
Voorinstellingen 02_shadow en mz_glass_ann(Eye Candy Filter)
**************
Plugins
AAA Frames - Foto Frame
Alien Skin Eye Candy 5 - Impact - Perspective Shadow en Glass
Filters Unlimited 2.0 - &<Bkg Designer sf10I> - Corner Half Wrap
Medhi - Wavy Lab 1.1
Mock - Windo
VanDerLee - UnPlugged X - Rotocube en 45° Rectangle
Visual Manipulation - X-Mirror en Y-Mirror
VM Natural - Speed
PLuginS HERe
Double click on the Presets 02_shadow and mz_glass_ann, to install in Eye Candy Filter (or import yourself)
Selections in Selectionmap, open Tube, Masks, Deco's etc. in Psp
Use colors from your Tube, play with the Blend Mode and Opacity
Respect the work/material of the tubers and do not delete the name of the artist
Colors original Tutorial

Make your own Color Palette to switch the Colors easely
TUTORIAL
1
Open material in Psp, duplicate (shift D) and close the original, work with duplicates
-
Foregroundcolor = Color 2 and Backgroundcolor = Color 4
Open a New transparent Image of 850 bij 500 px
-
Effects - Plugins - Medhi Wavy Lab 1.1 - Bow
Colors 4 2 3 1

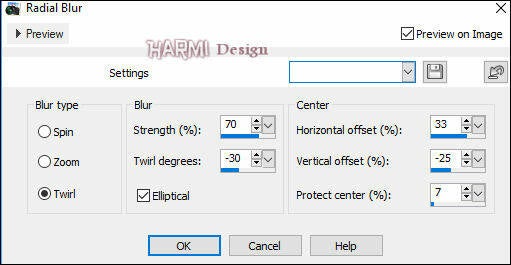
Adjust - Blur - Radial Blur

2
Effects - Plugins - VanDerLee - UnPlugged X - Rotocube

Effects - Plugins - Visual Manipulation - X-Mirror

Effects - Plugins - Toadies - What Are You?
20 - 20
-
Adjust - Sharpness - Sharpen More
3
Layers - Duplicate
-
Effects - Plugins - Filters Unlimited 2.0 - &<Bkg Designer sf10I> - Corner Half Wrap
-
Effects - Plugins - Visual Manipulation - Y-Mirror

Blend Mode to Multiply or another one
-
Effects - Distortion Effects - Pinch - 100
4
Selections - Load/Save Selection - Load Selection From Disk - mz_sel_ann
Selections - Promote Selection to Layer
-
Effects - Plugins - VM Natural - Speed
Default 104 85 28 0
-
Selections - Select None
-
Effects - Plugins - Alien Skin Eye Candy 5 - Impact - Perspective Shadow - search for 02_shadow

5
Layers - Merge - Merge All (Flatten)
-
Effects - Plugins - Mock - Windo

Effects - Reflection Effects - Feedback

6
Selections - Load/Save Selection - Load Selection From Disk - mz_sel_ann1
Selections - Promote Selection to Layer
-
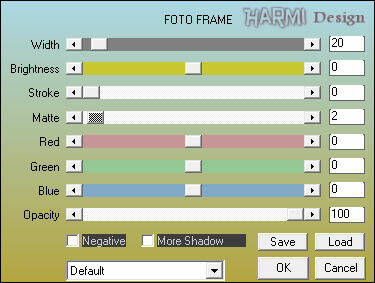
Effects - Plugins - AAA Frames - Foto Frame

Selections - Select None
-
Effects - Plugins - Alien Skin Eye Candy 5 - Impact - Perspective Shadow - search for 02_shadow
7
Activate Bottom Layer
Selections - Load/Save Selection - Load Selection From Disk - mz_sel_ann2
-
Effects - Plugins - AAA Frames - Foto Frame - see point 6
-
Effects - Plugins - Alien Skin Eye Candy 5 - Impact - Perspective Shadow - search for 02_shadow
-
Selections - Invert
-
Effects - Plugins - AAA Frames - Foto Frame

Selections - Select None
8
Selections - Load/Save Selection - Load Selection From Disk - mz_sel_ann3
Activate Top Layer
-
Effects - Plugins - Alien Skin Eye Candy 5 - Impact - Glass - search for mz_glass_ann

Selections - Select None
9
Layers - New Raster Layer
-
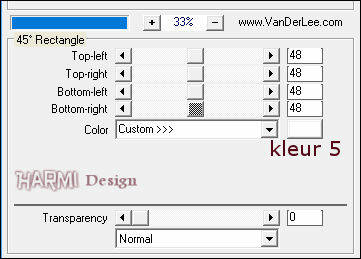
Effects - Plugins - VanDerLee - UnPlugged X - 45° Rectangle - (Color 5 = White)

Effects - Image Effects - Offset
Horizontal 288 and Vertical 0
Custom and Transparant checked
10
Activate your Magic Wand Tool (Tolerance and Feather to 0)
Clink in the middle of the White Diamondshape
-
Selections - Modify - Contract - 10
Edit - Cut
Selections - Select None
Layers - Arrange - Move Down
Edit - Paste As New Layer
Blend Mode to Soft Light or another one
-
Effects - Image Effects - Seamless Tiling

Effects - Plugins - Alien Skin Eye Candy 5 - Impact - Perspective Shadow - search fo 02_shadow
11
Open your Tube
Edit - Copy
Back to your Image
Activate Top Layer
Edit - Paste As New Layer
-
Drag Tube to the Left, Resize eventually and give a Drop Shadow
-
Image - Add Borders - 3 px with White - Symmetric
Activate your Magic Wand Tool (Tolerance and Feather to 0) and select this White Border
-
Effects - 3D Effects - Inner Bevel

Selections - Select None
12
Layers - Duplicate
Image - Resize - 80% - Resize All Layers NOT Checked
-
Effects - Plugins - Alien Skin Eye Candy 5 - Impact - Perspective Shadow - search for 02_shadow
-
Activate Bottom Layer
Adjust - Blur - Gaussian Blur - 30
-
Open Mask - Narah_mask_0183
Image - Mirror
Image - Flip
-
Back to your Image
Layers - New Raster Layer
Fill with White
Layers - New Mask Layer - From Image......Narah_mask_0183

Layers - Merge - Merge Group
13
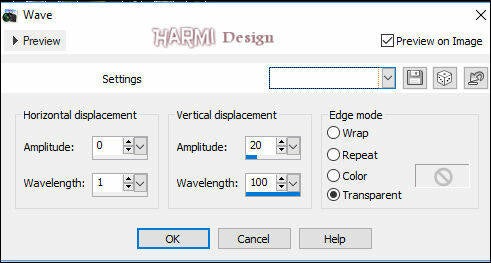
Effects - Distortion Effects - Wave

Effects - Plugins - Alien Skin Eye Candy 5 - Impact - Perspective Shadow - search for 02_shadow
-
Blend Mode to Overlay or another one
Layers - Duplicate
Image - Mirror
Image - Flip
-
Selections - Select All
Image - Add Borders - 4 px with White - Symmetric
Selections - Invert
-
Effects - 3D Effects - Inner Bevel (same Settings)
-
Effects - 3D-effects - Drop Shadow
0 0 60 20 Black
-
Selections - Select None
14
Open ann_titre
Edit - Copy
Back to your Image
Edit - Paste As New Layer
-
Drag to a nice Place
-
Open ann_text
Edit - Copy
Back to your Image
Edit - Paste As New Layer
-
Blend Mode to Soft Light or another one
Set your name/watermark on a new Layer and Merge All, Resize eventually
I really like to see your Version
Another version, Tube Alies


