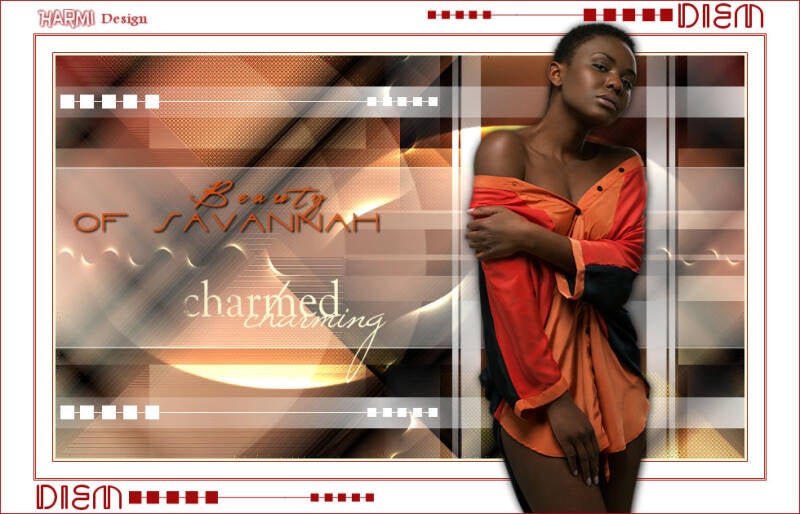
diem


This Translation has been made with PSPX5 and PSPX9, it's also possible with other versions of PSP
The original Tutorial is from Monaliza, I have her permission to translate it into Dutch and English
Merci Monique
Use your own Woman/Man-tube
My Tube: 1798-Woman-LB TUBES
It's not allowed to copy or download this tutorial in other sites/blogs without permission or spread under your own name
Click on the banner for the original tutorial

**************
Materials

**************
In Zip
demisphèr (Masker)
masklu110
masklu732
mz_diem_deco
diem_deco_cadre
mz_diem_inclinaison
sign 19
sign 74
diem.PspGradient
flexify 2 settings.q2q
Preset 02_shadow (Eye Candy Filter)
diem_couleurs
**************
Plugins
Alien Skin Eyes Candy 5 - Impact - Perspective Shadow
Filters Unlimited 2.0 - &<BKG Kaleidoscope - @BlueberryPie
Flaming Pear - Flexify2
plugins Here
Doubleclick on the Preset 02_shadow to install in Eye Candy Filter (or import yourself)
Open Tube, Masks etc. in Psp, Gradient in Gradient-map Psp
Use Colors from your Tube, play with the Blend Mode and Opacity
Respect the work/material of the tubers and do not delete the name of the artist, don't share
Colors original Tutorial

Make your own Colorpalette, to switch Colors easely
TUTORIAL
1
Open materials in Psp, duplicate (shift D) and close the original, work with duplicates
Foregroundcolor (1) and Backgroundcolor (2)
Search for gradient "diem" and make a Linear Gradient

Click on Edit, to change the gradient to your own Colors
Click on 1, 2, 3 and 4 to change the Colors to your own Colors

After that, Save as.......Diem1
Click OK then Close and the Gradient has changed
2
Open a New transparent Image of 850 / 500 px
Fill with Gradient
-
Effects - Texture Effects - Polished Stone

Adjust - Sharpness - Sharpen More
-
Effects - Image Effects - Seamless Tiling

3
Layers - Duplicate
-
Effects - Plugins - Filters Unlimited 2.0 - &<BKG Kaleidoscope> - @BlueberryPie

Effects - Texture Effects - Weave - Color 4

Blend Mode to Multiply
-
Open mz_diem_inclinaison
Edit - Copy
Back to your Image
Edit - Paste As New Layer
-
Blend Mode to Overlay
4
Layers - New Raster Layer
Fill with White
Layers - New Mask Layer - From Image......masklu732

Layers - Merge - Merge Group
Blend Mode to Soft Light or another one
-
Effects - Plugins - Alien Skin Eyes Candy 5 - Impact - Perspective Shadow - search for 02_shadow

5
Layers - New Raster Layer
Fill with White
Layers - New Mask Layer - From Image.......masklu110
Layers - Merge - Merge Group
-
Effects - Image Effects - Offset
Horizontal: 200 / Vertical: 0
Custom and Repeat checked
-
Blend Mode to Screen
Opacity at your choice (with these Colors 85)
6
Layers - New Raster Layer
Fill with Color 4
Layers - New Mask Layer - From Image.......demisphèr
Layers - Merge - Merge Group
Blend Mode to Dodge or another one
7
Layers - Duplicate
-
Effects - Plugins - Flaming Pear - Flexify2
Click on the red Arrow, see Printscreen below and search for flexify 2 settings.q2q in Materials
then you have the right settings

Selections - Select All
Layers - New Raster Layer
Fill with Color 4
-
Selections - Modify - Contract 3
Click Delete once on your Keyboard
Selections - Select None
-
Image - Add Borders 1 px with Color 1 - Symmetric
8
Image - Add Borders 20 px with Color White - Symmetric
Image - Add Borders 1 px with Color 1 - Symmetric
Image - Add Borders 1 px with Color 4 - Symmetric
Image - Add Borders 1 px with Color 1 - Symmetric
Image - Add Borders 40 px with Color White - Symmetric
9
Open your Tube
Edit - Copy
Back to your Image
Edit - Paste As New Layer
-
Drag Tube to the right and give a Drop Shadow
-
Open Sign 74
Edit - Copy
Back to your Image
Edit - Paste As New Layer
-
Image - Resize - 70% - Resize all Layers not checked
Adjust Color eventually
-
Press K on Keyboard (Pick Tool)
Position X (Hor.) 89 / Position Y (Vert.) 219

Press M on Keyboard (Move Tool)
10
Open Sign 19
Edit - Copy
Back to your Image
Edit - Paste As New Layer
-
Image - Resize - 50% - Resize all Layers not checked
Adjust Color eventually
-
Press K on Keyboard (Pick Tool)
Position X (Hor.) 223 / Position Y (Vert.) 340
Press M on Keyboard (Move Tool)
-
Open mz_diem_deco
Edit - Copy
Back to your Image
Edit - Paste As New Layer
-
Adjust Color eventually
-
Press K on Keyboard (Pick Tool)
Position X (Hor.) 73 / Position Y (Vert.) 115
Press M on Keyboard (Move Tool)
-
Open diem_deco_cadre
Edit - Copy
Back to your Image
Edit - Paste As New Layer
-
Adjust Color eventually
Image - Add Borders 1 px with Color 1 - Symmetric
Set your name/watermark on a new Layer and Merge All, Resize if you like and save as Jpg
I really like to see your Version

Another version, tube 1757-woman-LB TUBES