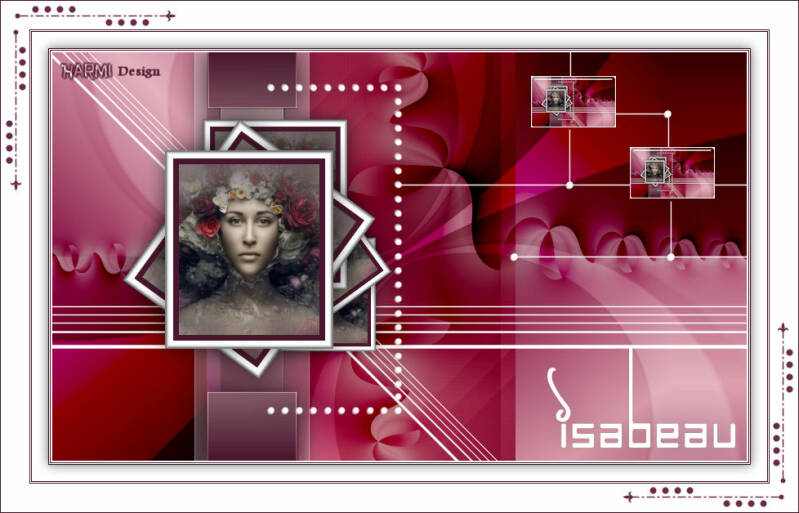
isabeau
This translation has been made with PSPX5 and PSPX9, it's also possible with other versions of PSP
The original Tutorial is from Monaliza, I have her permission to translate it in Dutch and English
Merci Monique
Use your own Image Jpg (man/woman)
My Image: Karine Dreams
It's not allowed to copy or download this tutorial in other sites/blogs without permission or spread under your own name
Click on the banner for the original tutorial

**************
Material

**************
In Zip
isabeau_deco
isabeau_deco_cadre
isabeau_lignes
isabeau_titre
mz_sel_isabeau - 6 selections
isabeau1.q2q
isabeau2.q2q
Voorinstellingen 02- and 04_shadow and isabeau_glass (Eye Candy Filter)
**************
Plugins
Alien Skin Eyes Candy 5 - Impact - Perspective Shadow en Glass
Filters Unlimited 2.0 - Buttons and Frames
Flaming Pear - Flexify2
Itali@n Editors Effects - Effetto Fantasma
MuRa's Meister - Copies
MuRa's Seamless - Tile Rotate
RCS Filter Pack 1.0 - RCS Triple Exposure
plugins Here
Double click on the Presets 02 and 04_shadow and isabeau_glass, to install in Eye Candy Filter (or import yourself)
Selections in Selectionmap, open Tube, Deco's etc. in Psp
Use 2 Colors (a dark and a lighter one) from your Tube, play with the Blend Mode and Opacity
Respect the work/material of the tubers and do not delete the name of the artist
TUTORIAL
1
Open material in Psp, duplicate (shift D) and close the original, work with duplicates
Foregroundcolor = a dark one and Backgroundcolor a lighter one
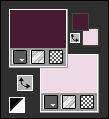
Create with your Foregroundcolor a Linear Gradient
Angle 45 - Repeats 1
Open a New transparent Image of 850 bij 500 px
Fill wit Gradient
Effects - Plugins - MuRa's Seamless - Tile Rotate

2
Layers - Duplicate
Effects - Plugins - Flaming Pear - Flexify 2 - preset isabeau1
click on the red Arrow (see printscreen) and search for isabeau1.q2q (in Zip) and click Open
When you don't manage it, see for the settings the Printscreen below

Blend Mode to Burn or another one, depends on the colors
3
Activate Bottom Layer
Selections - Load/Save Selection - Load Selection From Disk - mz_sel_isabeau
Selections - Promote Selection to Layer
-
Effects - Geometric Effects - Skew
Selections - Select None
-
Effects - Plugins - RCS Filter Pack 1.0 - RCS Triple Exposure

4
Activate Bottom Layer
-
Effects - Image Effects - Offset

Selections - Load/Save Selection - Load Selection From Disk - again mz_sel_isabeau
Selections - Promote Selection to Layer
-
Effects - Reflection Effects - Rotating Mirror

Layers - Arrange - Move Up
Effects - Edge Effects - Enhance
Blend Mode to Multiply or another one
Selection still active
5
Activate Top Layer
Change Foregroundcolor to White
Selections - Load/Save Selection - Load Selection From Disk - mz_sel_isabeau1 (overwrites the previous selection)
Layers - New Raster Layer
Fill with White
Selections - Select None
-
Effects - Plugins - Flaming Pear - Flexify 2 - preset isabeau2
click on the red Arrow (see printscreen) and search for isabeau2.q2q (in Zip) and click Open
When you don't manage it, see for the settings the Printscreen below

Blend Mode to Soft Light or another one
6
Open isabeau_lignes
Edit - Copy
Back to your Image
Edit - Paste As New Layer
-
Press K on Keyboard (Pick Tool)
Position X: -10 and Position Y: 310

Press M on Keyboard (Move Tool)
Layers - Duplicate
-
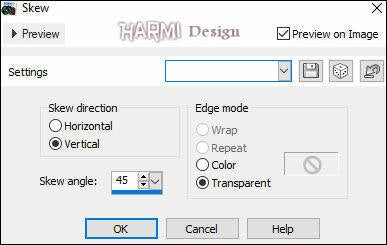
Effects - Geometric Effects - Skew
Vertical - now min45 - Transparant
-
Effects - Image Effects - Offset
Horizontal min70 and Vertical 0
Custom and Repeat checked
7
Create a Linear Gradient with the Colors from the beginning of the Tutorial (see Point 1)
Angle 45 Repeats 0
-
Selections - Load/Save Selection - Load Selection From Disk - mz_sel_isabeau2
Layers - New Raster Layer
Fill with Gradient
Selections - Select None
-
Effects - Plugins - Itali@n Editors Effects - Effetto Fantasma

Effecs - Edge Effects - Enhance
-
Effects - Plugins - Alien Skin Eyes Candy 5 - Impact - Perspective Shadow - search for 02_shadow

8
Create a Linear Gradient with the Colors from the beginning of the Tutorial (see Point 1)
Angle 0 Repeats 1
-
Selections - Load/Save Selection - Load Selection From Disk - mz_sel_isabeau3
Layers - New Raster Layer
Fill with Gradient
Selections - Select None
Effects - Edge Effects - Enhance
-
Effects - Plugins - Alien Skin Eyes Candy 5 - Impact - Perspective Shadow - search for 02_shadow
9
Change Backgroundcolor to White and Foregroundcolor to your dark Color
Selections - Load/Save Selection - Load Selection From Disk - mz_sel_isabeau4
Layers - New Raster Layer
Fill with White
-
Selections - Modify - Contract - 10
Fill with your Dark Color
Selections - Modify - Contract - 7
-
Open your Image man or woman
Edit - Copy
Back to your Image
Edit - Paste into Selection
-
Selections - Select None
10
Activate your Magic Wand Tool (Feather and Tolerate 0) and select the White Border
-
Effects - Plugins - Filters Unlimited 2.0 - Buttons & Frames - Glass Frame 1 (default)
-
Selections - Select None
-
Effects - Plugins - Alien Skin Eyes Candy 5 - Impact - Perspective Shadow - search for 02_shadow
-
Layers - Duplicate
-
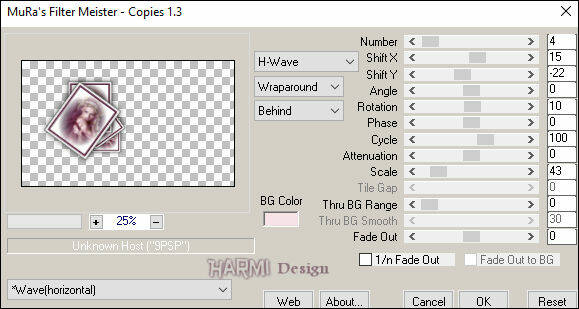
Effects - Plugins - MuRa's Meister - Copies
Layers - Arrange - Move Down
11
Activate Top Layer
Selections - Load/Save Selection - Load Selection From Disk - mz_sel_isabeau5
Layers - New Raster Layer
Fill with White
Selections - Select None
-
Effects - Plugins - Alien Skin Eyes Candy 5 - Impact - Perspective Shadow - search for 02_shadow
12
Edit - Copy Special - Copy Merged
Edit - Paste as New Image
-
Image - Resize - 100 x 59 px - Resize all Layers checked
-
Image - Add Borders 2 px with White - Symmetric
-
Effects - Plugins - Alien Skin Eyes Candy 5 - Impact - Glass - search for isabeau_glass

13
Edit - Copy
Back to your original Image
Edit - Paste As New Layer
-
Press K on Keyboard (Pick Tool)
Position X: 586 and Position Y: 29
Press M on Keyboard (Move Tool)
-
Layers - Duplicate
-
Press K on Keyboard (Pick Tool)
Position X: 707 and Position Y: 116
Press M on Keyboard (Move Tool)
14
Open - isabeau_deco
Edit - Copy
Back to your Image
Edit - Paste As New Layer
-
Press K on Keyboard (Pick Tool)
Position X: 423 and Position Y: min3
Press M on Keyboard (Move Tool)
-
Layers - Arrange - Move Down - 2 times
-
Open - isabeau_titre
Edit - Copy
Back to your Image
Edit - Paste As New Layer
-
Drag to the Right to the Bottom, see Image at Top
-
Effects - Plugins - Alien Skin Eyes Candy 5 - Impact - Perspective Shadow - search for 04_shadow

15
Image - Add Borders 2 px with White - Symmetric
Image - Add Borders 1 px dark Color - Symmetric
Image - Add Borders 1 px with White - Symmetric
Image - Add Borders 1 px dark Color - Symmetric
-
Selections - Select All
-
Image - Add Borders 20 px with White - Symmetric
-
Effects - 3D-effects - Drop Shadow
0 0 60 20 Black
-
Selections - Select None
-
Image - Add Borders 1 px dark Color - Symmetric
Image - Add Borders 1 px with White - Symmetrisch
Image - Add Borders 1 px dark Color - Symmetric
Image - Add Borders 35 px with White - Symmetric
Image - Add Borders 1 px dark Color - Symmetric
16
Open isabeau_deco_cadre
Edit - Copy
Back to your Image
Edit - Paste As New Layer
-
Drag to the Left Top Corner, see Image at top
Change Color eventually
Layers - Duplicate
Image - Mirror
Image - Flip
Set your name/watermark on a new Layer and Merge All
Save as Jpg
I really like to see your Version
