colorful .......

This translation has been made with PSP19, it's also possible with other versions of PSP
It's not allowed to copy or download this tutorial in other sites/blogs without permission or spread under your own name
©Psp-Art-Harmi
When you're working with other Tubes and Colors play with the Blend Mode and Opacity
Respect the work of the tubers and do not delete the name of the artist
Your Versions HERE
In Zip
Tubes
womantube: TubeNaraPamplona1559
Gabry-fiori71-17
Mask
@Ildiko_Mask_free_017
Selections
hpkselectie 98/99/100
Preset
harmishadow 2
Colors
Thanks everybody for the material
Material

Plugins
Alien Skin Eye Candy 5: Impact - Perspective Shadow - harmishadow2
AP 01 [Innovations] Lines - Silverlining - Arrow
Filters Unlimited 2.0 - Paper Textures - Hemp Paper 1
Filters Unlimited 2.0 - Tramages - Cirquelate
Filters Unlimites 2.0 - Tramages - Tow The Line
Graphics Plus - Cross Shadow
Medhi - Wavy Lab - Bow
MuRa's Meister - Perspective Tiling
Toadies - Weaver
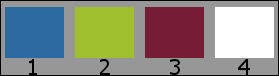
Used Colors
Open Tubes and Mask in Psp, Selections in Selectionmap, use the Color Palette to switch the Colors easely
Doubleclick on the Eye Candy Preset harmishadow2, it will be imported automatically, or import by yourself
When you are using your own Tubes watch the Size (compare the size with the Tubes in Tutorial)
Choose a multicolored Tube
Tutorial
1
Open a New transparant Image of 850 x 550 px
2
Set Foregroundcolor to Color 2 and set Backgroundcolor to Color 1
3
Effects - Plugins - Medhi - Wavy Lab - Bow
Make a note with the numbers of your colors
You can use Color 4 instead of color 3 for a different result

4
Layers - Duplicate
5
Image - Mirror
6
Opacity to 50
7
Effects - Image Effects - Seamless Tiling
Default
8
Layers - Merge - Merge Down
9
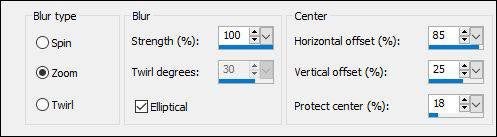
Adjust - Blur - Radial Blur
10
Effects - Plugins - Filters Unlimited 2.0 - Tramages - Cirquelate
Cirquels to 60
11
Selections - Select All
12
Layers - New Raster Layer
13
Open TubeNaraPamplona1559 or your own Man/Woman Tube (watch the Size)
Edit - Copy
Back to your Image
Edit - Paste Into Selection
14
Selections - Select None
15
Effects - Distortion Effects - Pixelate
25 Symmetric
16
Effects - Plugins - Toadies - Weaver

17
Set Blend Mode to Overlay (or another)
18
Opacity to 70
19
Effects - Edge Effects - Enhance
20
Layers - Duplicate
21
Image - Free Rotate - 90 - Left
22
View - Rulers checked
23
Activate Selectiontool (K) or type k on your keyboard
24
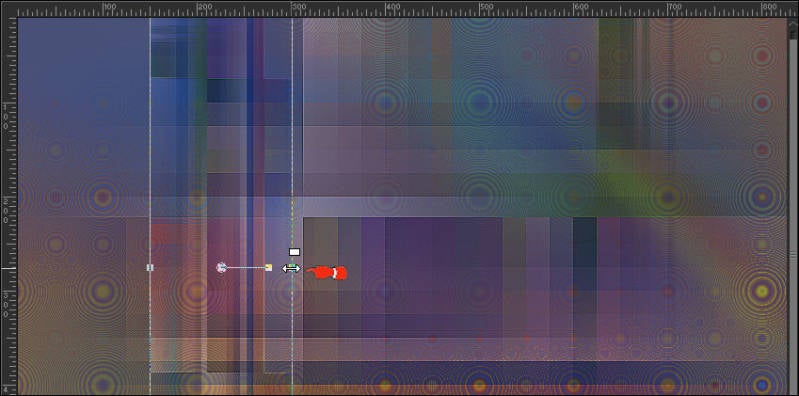
Drag this layer to the left till 300
25
Type m on your keyboard
View - Rulers Unchecked
26
Effects - Image Effects - Offset
Horizontal minus 150 - Vertical 0
Custom and Transparant checked
27
Effects - Texture Effects - Blinds - Color 1, 2, 3 or 4 what you prefer
Width 8 - Opacity 100
Light from left/top checked
28
Effects - Plugins - AP 01 [Innovations] Lines - Silverlining - Arrow

29
Layers - Duplicate
30
Adjust - Blur - Gaussian Blur - Radius 25
31
Set Blend Mode to Soft Light (or another)
32
Opacity to 100
33
Layers - Arrange - Move Down
34
Activate Top Layer
35
Layers - New Raster Layer
36
Fill with one of the Colors
37
Layers - New Mask Layer - From Image...@Ildiko_Mask_free_017
Layers - Merge - Merge Group
38
Effects - Plugins - Filters Unlimites 2.0 - Tramages - Tow The Line

39
Activate Selection Tool - Custom Selection


40
Click on Delete (Keyboard) once
41
Selections - Select None
42
Layers - New Raster Layer
43
Selections - Load/Save Selection - Load Selection From Disk - HPKselectie98
44
Fill Selection with Color 3
45
Selections - Modify - Contract 2
46
Fill Selection with Color 2
47
Selections - Modify - Contract 2
48
Fill Selection with Color 3
Selections - Modify - Contract 2
49
Click on Delete (Keyboard) once
50
Open Gabry-fiori71-17 or your own Tube
Edit - Copy
Back to your Image
Edit - Paste As New Layer
51
Drag a part from Tube into Selection
52
Selections - Invert
53
Click on Delete (Keyboard) once
54
Selections - Select None
Opacity to 70
55
Effects - Plugins - Filters Unlimited 2.0 - Paper Textures - Hemp Paper 1

56
Layers - Merge - Merge Down
57
Effects - Plugins - Alien Skin Eye Candy 5: Impact - Perspective Shadow - harmishadow2
Color 2

58
Activate Bottom Layer
59
Selections - Load/Save Selection - Load Selection From Disk - HPKselectie99
60
Selections - Promote Selection to Layer
61
Layers - Arrange - Bring to Top
62
Selections - Select None
63
Effects - Geometric Effects - Skew

64
Effects - Plugins - Alien Skin Eye Candy 5: Impact - Perspective Shadow - harmishadow2
Color 2
65
Set Blend Mode to Overlay (or another)
66
Opacity to 60
67
Effects - Edge Effects - Enhance
68
Layers - New Raster Layer
69
Selections - Load/Save Selection - Load Selection From Disk - HPKselectie100
70
Fill Selection with Color 3
71
Selections - Modify - Contract 2
72
Fill Selection with Color 2
73
Selections - Modify - Contract 2
74
Fill Selection with Color 3
Selections - Modify - Contract 2
75
Click on Delete (Keyboard) once
76
Open Gabry-fiori71-17 or your own Tube
Edit - Copy
Back to your Image
Edit - Paste As New Layer
77
Drag a part from Tube into Selection
78
Selections - Invert
79
Click on Delete (Keyboard) once
80
Selections - Select None
Opacity to 70
81
Effects - Texture Effects - Blinds - Color 1, 2, 3 or 4 what you prefer
Width 7 - Opacity 75
Light from left/top checked
82
Effects - Texture Effects - Blinds - Same color as above
Width 9 - Opacity 70
Horizontal and light from left/top both checked
83
Effects - Edge Effects - Enhance
84
Layers - Merge - Merge Down
85
Effects - Plugins - Alien Skin Eye Candy 5: Impact - Perspective Shadow - harmishadow2
Color 2
86
Activate Bottom Layer
87
Layers - Duplicate
88
Effects - Plugins - MuRa's Meister - Perspective Tiling
80 / min75 / 0 / 10 / 42 / min23 / 100 / 255

89
Effects - 3D-effects - Drop Shadow
2 2 90 25 Color 2
90
Layers - Arrange - Bring to Top
91
Open Gabry-fiori71-17 or your own Tube
Edit - Copy
Back to your Image
Edit - Paste As New Layer
92
Resize eventually, I did 3 times 80% with this Tube, but it depends on the Tube
Drag Tube between the rectangles and to the Bottom (see Image at Top)
93
Effects - Plugins - Alien Skin Eye Candy 5: Impact - Perspective Shadow - harmishadow2
94
Open TubeNaraPamplona1559 or your own Man/Woman Tube
Image - Mirror
Edit - Copy
Back to your Image
Edit - Paste As New Layer
95
Resize eventually, I did 2 times 80% with this Tube, but it depends on the Tube
96
Drag Tube to the Left, see Image at Top
97
Layers - Duplicate
98
Adjust - Blur - Gaussian Blur - Radius - 25
99
Set Blend Mode to Screen
100
Effects - Texture Effects - Blinds - Color 2 or another
Width 3 - Opacity 100
Horizontal and Light from left/top both checked
101
Effects - Edge Effects - Enhance
102
Layers - Arrange - Move Down
103
Activate Top Layer
Effects - Plugins - Alien Skin Eye Candy 5: Impact - Perspective Shadow - harmishadow2
104
Image - Add Borders - 2 px Color 2 - Symmetric
Image - Add Borders - 15 px Color 1 - Symmetric
Image - Add Borders - 2 px Color 2 - Symmetric
105
Activate Magic Wand Tool (Tolerance/Feather 0) and select 15 px Border
106
Effects - Plugins - Graphics Plus - Cross Shadow - Default
107
Selections - Select None
108
Write a Text with Drop Shadow 2 times and drag to a nice Place
Set your name/watermark and Save as Jpg
©Psp-Art-Harmi
17-06-2017
I look forward to your creation
@

Another example by myself, Tubes Syl en Alies

Tested by Manuela en Ria
Thank you girls
Manuela 1 - Tubes Yoka and Linda Ferdinand

Manuela 2 - Tubes OBG and Isa

Ria, Tube Grisi
