end of summer


This translation has been made with PSP15, it's also possible with other versions of PSP
It's not allowed to copy or download this tutorial in other sites/blogs without permission or spread under your own name
©Psp-Art-Harmi
When you're working with other Tubes and Colors play with the Blend Mode and Opacity
Respect the work of the tubers and do not delete the name of the artist
It's not allowed to share the Material
Your Versions HERE
In Zip
Tubes
5020 luzcristina
SoniaTubes 7475
Mask
Narah_Mask_1213
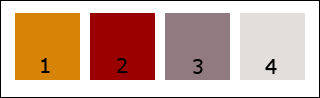
Colors
Thanks everybody for the material
Material

Plugins
AP 01 [Innovations] Lines - Silverlining - Dotty Grid en Dotty Lines
Filters Unlimited 2.0 - VM Distortion - Circulator
Filters Unlimited 2.0 - VM Extravaganza - Transmission
Flaming Pear - Flood
Used Colors
Open Tubes/Mask in Psp
Use the Color Palette to switch the Colors easely or make your own Palette
When you are using your own Tubes watch the Size (compare the size with the Tubes in Tutorial)
Tutorial
1
Open a New transparent Image of 850 x 550 px
Foregroundcolor = Color 3 and Backgroundcolor = Color 4
2
Make a Linear Gradient with your Foregroundcolor
Angle 130 / Repeats 0
3
Fill Image with Gradient
Selections - Select All
4
Open 5020 luzcristina or your woman/mantube
Edit - Copy
Back to your Image
Edit - Paste into Selection
5
Selections - Select None
6
Effects - Image Effects - Seamless Tiling
Default
7
Adjust - Blur - Radial Blur

8
Layers - Duplicate
Image - Mirror
Image - Flip
9
Blend Mode to Overlay
Layers - Merge - Merge Down
10
Effects - Image Effects - Seamless Tiling
Side by Side
11
Effects - Edge Effects - Enhance
12
Layers - Duplicate
13
Image - Resize - 80% - Resize all layers Not Checked
Image - Flip
14
Effects - Plugins - Filters Unlimited 2.0 - VM Distortion - Circulator

15
Layers - Duplicate - Repeate once
Close the 2 layers at the top in your Layer Palette (click on the Eye)
Activate the second Layer from the Bottom (Copy from Raster 1)
16
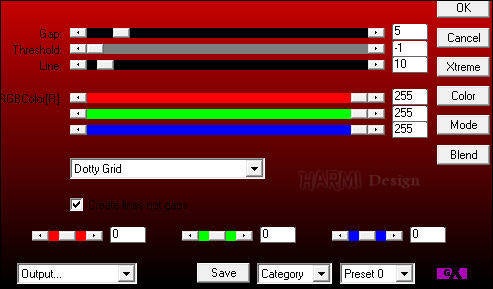
Effects - Plugins - AP 01 [Innovations] Lines - Silverlining - Dotty Grid

17
Effects - 3D-effects - Drop Shadow
0 0 50 25 Color 2 or 3
18
Activate Layer just above (Copy (2) from Raster 1) and make Visible
Image - Resize - 80% - Resize all layers Not Checked
19
Effects - Plugins - AP 01 [Innovations] Lines - Silverlining - Dotty Lines

20
Effects - 3D-effects - Drop Shadow
0 0 50 25 Color 2 or 3
21
Activate Top Layer and make Visible
Image - Resize - 60% - Resize all layers Not Checked
22
Effects - Plugins - AP 01 [Innovations] Lines - Silverlining - Dotty Grid
23
Effects - 3D-effects - Drop Shadow
0 0 50 25 Color 2 or 3
24
Layers - Merge - Merge Down - Repeate once
25
Selections - Select All
Selections - Float
Selections - Defloat
26
Layers - New Raster Layer
27
Open SoniaTubes 7475 or your own background/landscape Tube
Edit - Copy
Back to your Image
Edit - Paste into Selection
28
Selections - Select None
Opacity to 20 or what you like the best
29
Layers - Merge - Merge Down
30
Activate Bottom Layer
Layers - Duplicate
31
Image - Resize - 75% - Resize all Layers Not Checked
Image - Flip
32
Effects - Geometric effects - Perspective Horizontal - Distortion 55 - Transparent
33
Press K on Keyboard (Pick Tool)
Position X: 0 and Position Y: 94

Press M on Keyboard (Move Tool)
34
Layers - Duplicate
Image - Mirror
Layers - Merge - Merge Down
35
Effects - 3D-effects - Drop Shadow
0 0 50 25 Color 2 of 3
36
Effects - Texture Effects - Blinds - Color 2

37
Selections - Select All
Selections - Float
Selections - Defloat
38
Layers - New Raster Layer
39
Open SoniaTubes 7475 or your own background/landscape Tube
Edit - Copy
Back to your Image
Edit - Paste into Selection
40
Selections - Select None
41
Opacity to 40 or what you like the best
Layers - Merge - Merge Down
42
Activate Top Layer
Layers - Duplicate
43
Image - Resize - 25% - Resize all Layers Not Checked
44
Press K on Keyboard (Pick Tool)
Position X: 45 and Position Y: 45
Press M on Keyboard (Move Tool)
45
Layers - Duplicate
Image - Resize - 75% - Resize all Layers Not Checked
46
Press K on Keyboard (Pick Tool)
Position X: 180 and Position Y: 78
Press M on Keyboard (Move Tool)
47
Layers - Merge - Merge Down
Layers - Duplicate
48
Image - Resize - 75% - Resize all Layers Not Checked
Image - Mirror
49
Press K on Keyboard (Pick Tool)
Position X: 640 and Position Y: 60
Press M on Keyboard (Move Tool)
50
Image - Flip
Layers - Merge - Merge Down
51
Effects - Plugins - AP 01 [Innovations] Lines - Silverlining - Dotty Grid

52
Layers - New Raster Layer
Fill with Color 4
53
Layers - New Mask Layer - From Image.......Narah_Mask_1213
Layers - Merge - Merge Group
54
Effects - Edge Effects - Enhance
Set Blend Mode to Overlay
Opacity to 80
55
Layers - Arrange - Move Down - totally 3 times
56
Activate Top Layer
Window - Duplicate (Shift D)
57
On this duplicated Window:
Layers - Merge - Merge Visible
58
Effects - Geometric Effects - Perspective Horizontal - Distortion min 55 - Transparent
Put this Image aside for awhile
59
Go back to your original Image
Layers - Merge - Merge Visible
Edit - Copy
60
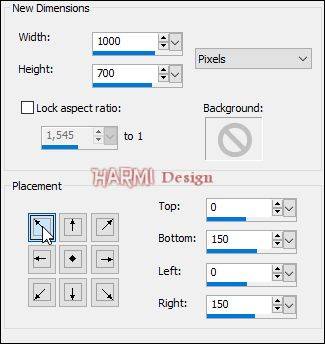
Image - Canvas Size
61
Activate Magic Wand Tool (Feather and Tolerance to 0) and select the Transparent Part
Edit - Paste into Selection
62
Adjust - Blur - Gaussian Blur - 15
63
Effects - Plugins - penta.com - jeans
46 - 6
64
Selections - Invert
65
Effects - 3D-effects - Drop Shadow
0 0 50 25 Color 2
66
Selections - Select None
67
Open the Image from point 58
Edit - Copy
68
Go back to your original Image
Edit - Paste As New Layer
69
Image - Resize - 35% - Resize all Layers Not Checked
70
Objects - Align - Right
71
Press K on Keyboard (Pick Tool)
Position X: 703 en Position Y: 183
Press M on Keyboard (Move Tool)
72
Effects - 3D-effects - Drop Shadow
0 0 50 25 Color 2
73
Layers - Duplicate
74
Image - Free Rotate - 90 - Right
75
Image - Resize - 75% - Resize all Layers Not Checked
76
Press K on Keyboard (Pick Tool)
Position X: 114 en Pos Y: 463
77
Layers - Duplicate
Image - Mirror
78
Position X: 22 en Position Y: 463
Press M on Keyboard (Move Tool)
79
Open 5020 luzcristina or your own Woman/Mantube
Edit - Copy
Back to your Image
Edit - Paste As New Layer
80
Image - Resize - 75% - Resize all Layers Not Checked
Depends on Tube
81
Press K on Keyboard (Pick Tool)
Position X: 400 en Position Y: 9
Depends on Tube
See Image on Top Tutorial for the position of the Tube
Press M on Keyboard (Move Tool)
82
Effects - Plugins - Flaming Pear - Flood

83
Image - Add Borders - Symmetric NOT CHECKED - Color 2

84
Image - Add Borders - Symmetric NOT CHECKED - Color 1
Left and Top 2 px, rest 0
85
Image - Add Borders - Symmetric NOT CHECKED - Color 4
Left and Top 40, rest 0
86
Image - Add Borders - Symmetric NOT CHECKED - Color 1
Left and Top 2 px, rest 0
87
Image - Add Borders - Symmetric NOT CHECKED - Color 2
Left and Top 1 px, rest 0
88
Activate Magic Wand Tool (Feather and Tolerance to 0) and select the Border of 40 px
Selections - Invert
89
Effects - Image Effects - Seamless Tiling
Default
Selections - Invert
90
Adjust - Blur - Gaussian Blur - 15
91
Effects - Plugins - Filters Unlimited 2.0 - VM Extravaganza - Transmission

92
Effects - Edge Effects - Enhance
Selections - Select None
93
Image - Add Borders - Symmetric NOT CHECKED - Color 1

94
Image - Add Borders - Symmetric NOT CHECKED - Color 2
Right and Bottom 1 px, rest 0
95
Set your name/watermark on a new Layer and Merge All
Image - resize 950 px
Save as Jpg
©Psp-Art-Harmi
20th September 2018
I look forward to your creation
@

Another one from me, tubes Wieske en Sonia

Getest door Ria, dank je wel voor deze pracht, tubes Anna Br en LuzCristina
